Update – It’s been a while since the workshop and unfortunately I deleted the VM, since I won’t be hosting any more workshops in the near future. I’ve updated the article with tips on building your own VM (or of course you could install it natively!), good luck!
I’m giving a workshop next week on how to build your own RISC-V CPU within a Lattice iCE40 series FPGA using the awesome Icestorm framework by Clifford Wolf. We need two toolchains here in order to create both the processor and the code to run on it, and we will build EVERYTHING here from source. Sorry – the VM I built has now expired, so I’m afraid you’ll need to rebuild one, here’s a great site to get you started.
Stage 1: Create a VM
The main issue with running up your own RISC-V cores is having the toolchain ready to go. So I created an Ubuntu VM, based on 18.04 minimal and running within Oracle VirtualBox. I chose minimal because it’s lightweight, small and will have a reasonably manageable footprint when putting the VM on a USB stick, and because Ubuntu is my native Linux distro. The choice of VirtualBox was down to it’s cross-platform compatibility and the fact that it’s free to use. The VM is configured for 4Gb RAM and 30Gb HDD, AMD64 CPU, with nothing fancy on top – I would recommend a similar approach when making your own VM. In order to facilitate cross platform compatibility and carrying it round on a USB drive, I’ve also set the HDD to be split across 2Gb files, since some file systems have a restriction on the maximum size of a single file. The total size of the VM comes to >17Gb, so make sure you have plenty of hard drive free!
I created the username “risc” with the password “Lattice”, but when making your own you should make wise choices! I don’t generally advocate writing your username and password on a blog, but this was a special case while I had the VM available. Evidently don’t leave this VM running, or give it open ports to the outside world when you are using it! If I do rebuild the VM (this time I’ll use Ubuntu 20.04, because it’s new.), I’ll post a link here, but unfortunately that isn’t going to be for a while – since I don’t plan on running any DIY CPU workshops during the pandemic.
Stage 2: Configure the VM
Once the VM has been setup, it’ll need the icestorm toolchain installing in order to program the FPGA. This comprises a number of things in more or less the following order:

1. FTDI drivers from here. It’s a .tar file, so you’ll need to unzip it a couple of times and then follow the instructions for how to copy the driver files in to your system directories as a super-user.
wget https://www.ftdichip.com/Drivers/D2XX/Linux/libftd2xx-x86_64-1.4.8.gz
tar xfvz libftd2xx-x86_64-1.4.8.gz
cd release
cd build
sudo -s
cp libftd2xx.* /usr/local/lib
chmod 0755 /usr/local/lib/libftd2xx.so.1.4.8
ln -sf /usr/local/lib/libftd2xx.so.1.4.8 /usr/local/lib/libftd2xx.so
exit
2. Packages to make everything work in Ubuntu (note I’ve added libeigen3-dev, not included on Clifford Wolf’s page, since I needed it):
sudo apt-get install build-essential clang bison flex libreadline-dev \
                     gawk tcl-dev libffi-dev git mercurial graphviz   \
                     xdot pkg-config python python3 libftdi-dev \
                     qt5-default python3-dev libboost-all-dev cmake libeigen3-dev
3. The Icestorm toolchain components from here:
4. A sample program to check we’ve got the FPGA compilation working, before we move to RISC-V compilation, from here. I cloned this code into a directory called flash, compiled it and uploaded it to my device to make it flash the leds in sequence. It worked first time, after I connected the USB device to the VM.
It’s worth noting at this point that I haven’t installed Icarus Verilog, since it isn’t strictly required to compile to the target, but would be needed if we wanted to test things! If I get time I’ll add it to the VM. Thanks to Oliver for pointing out this nice FPGA toolchain installation script.
UPDATE: I just added Icarus Verilog (V10) built from source and the Icicle repo for some better Upduino support. The Icicle serial output doesn’t seem to be working when flashed to target, but it does make the LEDs light up on the iCE40HX8K and Upduino boards. I also added minicom and picocom for serial monitoring.
Stage 3: RISC-V
Now that we’ve got a working toolchain for the FPGA, we need to build a working RISC-V compiler in order to have code to run on our chip. I installed Clifford Wolf’s Picorv32 from here. This basically takes you to the RISC-V mainline toolchain and picks out a particular revision and only the compiler required for smaller/less capable cores. When compiling it for the first time, I was stuck for a few hours on the ../configure line pre-compile to insure that the /opt/riscv32i toolset is used (the other toolsets are not compatible with the iCE40HX8K FPGA due to size restrictions), but eventually figured it out.
What we are actually building in this stage is an add on for GCC that will enable us to compile binaries for execution on our soon to be created RISC-V core. There’s no point having a CPU if we can’t aslo compile code for it from a high level language.

RISC-V implementation on iCE40-HX8K, image taken from the PicoSoC presentation given by Tim Edwards, Mohamed Kassem and Clifford Wolf at the 7th RISC-V Workshop, November 2017.
I followed the instructions in the picorv32 repo as follows:
git clone https://github.com/cliffordwolf/picorv32 picorv32

sudo apt-get install autoconf automake autotools-dev curl libmpc-dev \
        libmpfr-dev libgmp-dev gawk build-essential bison flex texinfo \
    gperf libtool patchutils bc zlib1g-dev git libexpat1-dev

sudo mkdir /opt/riscv32i
sudo chown $USER /opt/riscv32i

git clone https://github.com/riscv/riscv-gnu-toolchain riscv-gnu-toolchain-rv32i
cd riscv-gnu-toolchain-rv32i
git checkout 411d134
git submodule update --init --recursive

mkdir build; cd build
../configure --with-arch=rv32i --prefix=/opt/riscv32i
make -j$(nproc)
Stage 4: Hardware
Now the software is all ready to go, we just need a hardware platform to run it on.
This tutorial is designed to run on one of the following demo boards:
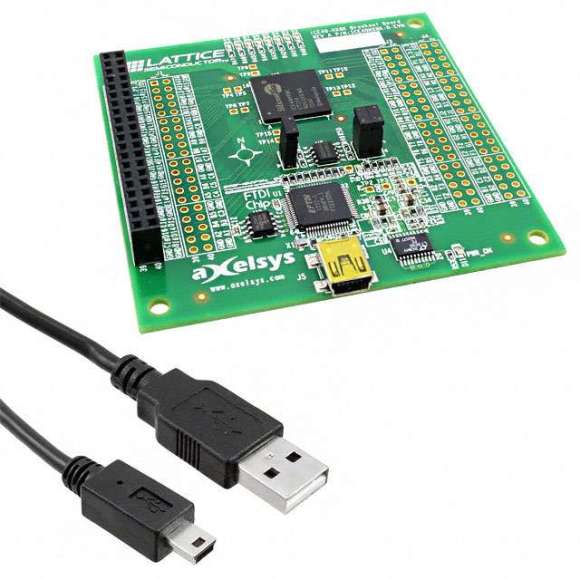
The Lattice iCE40-HX8K evaluation board, available from Digikey.

The UpDuino, available from GnaryGrey.

And the BlackIce II designed by a couple of awesome guys in the UK!
Stage 5: Compile and upload
Everything is very nearly finished. Except it doesn’t work just yet. We also need to install the VirtualBox expansion pack in order to access USB2 devices. We can download it here and add it via the GUI.
Then we need to ensure that we can find the compiler for RISC-V, which we can do by adding it to the PATH environmental variable:
export PATH="$PATH":/opt/riscv32i/bin
If you fail to do this, you’ll get a tonne of “riscv32-unknown-elf-gcc command not found” errors until you correct it. Make sure you don’t wipe out the path variable in the process!
And just to make sure we can access the device, let’s add our user to the dialout group:
sudo usermod -a -G dialout risc
With all of this in the bag, we need to ensure that our VM is connected to the USB hardware, which we can do via the menu or the USB attachment icon in the bottom right of our VM window. We should enable the Lattice device, and then we can complete our build and upload with the following commands:
cd /picorv32/picosoc
make hx8kprog
If everything works as it should you’ll see various messages about compilation and programming of the device, followed by “VERIFY OK cdone: high… Bye.”. The LEDs on your board wil blink about once a second. Note that there are several options for alternative things to do in the /picosoc directory, all without yet writing your own code or core, they are detailed in the makefile in the picosoc directory which is definitely worth reading.
It’s worth noting that I couldn’t get my permissions quite right so I had to cheat a little for access to the USB device to do the final upload, but calling make hx8kprog as sudo. Not the best technique, but it worked!
Conclusion – Testing the CPU
At this point I chose to unplug my FPGA dev board from the virtual host and hook it up to a real one (with the drivers installed of course!) to check that I’d actually built the core and it was working properly. I launched my trusty Arduino IDE and fired up the serial console, baud rate 115,200bps on the correct COM port and was greeted with this:

We have now built a working RISC-V core on our FPGA board and programmed it with some compiled code. I’d like to thank the awesome Clifford Wolf for basically making it all possible (he wrote the core we used to implement RISC-V and the ICESTORM toolchain we used to generate and upload our bitstream) and RMWJones for posting some very useful scripts that helped me along the way.

The link to the VM is dead. Is it still available?
Sorry, the VM is no more. I needed the space so deleted it. I can strongly encourage you (if you have the time) to try the process of compiling the toolchain from scratch, it’s highly educative and rewarding (in addition to being useful when you get to the end). Good luck!
Hello and thank you for a great article.
It seems that VM link has rotted away, essentially making the article unusable in practice. Can you re-upload it please?
Sorry, the VM is no more – I managed to delete all my copies 😦 I’ve updated the blog with a link to a site which will help you build your own toolchain. I hope it helps!
I was able to compile the toolchain and run it without issues on Ubuntu 20.04.
Thank you very much.
[…] Build your own CPU with RISC-V and a Lattice ICE40 FPGA […]
Unfortunately does not work for me, unsure why:
CXXLD gdb
/usr/sbin/ld: init.o: in function `initialize_all_files()’:
/riscv-gnu-toolchain-rv32i/build/build-gdb-newlib/gdb/init.c:227: undefined reference to `_initialize_string_view_selftests()’
collect2: error: ld returned 1 exit status
make[3]: *** [Makefile:1910: gdb] Error 1
[…] machine, as it is “simple and convenient.” Using FPGA toolchain icestorm and gcc toolchain riscv-gnu-toolchain, you can work on the board, alternatively, there also comes a pre-built toolchain provided by xPack […]
[…] machine, as it is “simple and convenient.” Using FPGA toolchain icestorm and gcc toolchain riscv-gnu-toolchain, you can work on the board, alternatively, there also comes a pre-built toolchain provided by xPack […]
[…] machine, as it is “simple and convenient.” Using FPGA toolchain icestorm and gcc toolchain riscv-gnu-toolchain, you can work on the board, alternatively, there also comes a pre-built toolchain provided by xPack […]
[…] machine, as it is “simple and convenient.” Using FPGA toolchain icestorm and gcc toolchain riscv-gnu-toolchain, you can work on the board, alternatively, there also comes a pre-built toolchain provided by xPack […]
[…] machine, as it is “simple and convenient.” Using FPGA toolchain icestorm and gcc toolchain riscv-gnu-toolchain, you can work on the board, alternatively, there also comes a pre-built toolchain provided by xPack […]
[…] machine, as it is “simple and convenient.” Using FPGA toolchain icestorm and gcc toolchain riscv-gnu-toolchain, you can work on the board, alternatively, there also comes a pre-built toolchain provided by xPack […]
Sorry for a potentially silly question but why there was a need for the Virtual Box to build the project? Can I use the actual Linux environment to implement the build?
Of course, I was just using this to make it easier to workshop for folks using non-linux os’s.
[…] with (not that I’m going to be designing a supercomputer myself) – you can check out this workshop I ran a few years ago about building your own chip on an FPGA. I recently read a fantastic article […]